Friday, January 28, 2011

Dating Vintage Sewing Patterns

If you love vintage style then most likely you own a few vintage wardrobe pieces. Over the years many of these vintage pieces have gotten moth holes, faded, or the fabric has become fragile. In some cases this can add to it's charm and it can become "shabby chic", but if your looking for just "chic" then be prepared to shell out some cash or if your handy with the sewing machine (why, yes, I am!) then you can do the vintage thing and just whip yourself up a lovely frock or two!

There are benefits to sewing your own clothing! Here are just a few good reasons:
  • We all know what colors look good on us so we can choose the fabrics that best suit our complexions. Vintage styles can also have an updated, fresh look with new fabrics. 
  • By premaking a pattern using inexpensive muslin, you can adjust the fit so that the outfit fits you like a glove!
  • Making new clothing from vintage patterns means you can easily wash and wear what you make without fear of it falling apart. Great for everyday wear!
  • Making a piece of clothing from vintage patterns will give you the same time of experience that someone from that era would have had! (It can be an experience, because many older patterns come unprinted!)
  • Exploring vintage patterns will further your knowledge of the fashions of that era.
Personally as I've begun exploring vintage fashions, I've found that I am most attracted to styles from the 1940's. That's not to say I wouldn't mind making a couple June Cleaver type dresses, but mainly my personality and what I am used to wearing is more figure flattering for the 1940's. I'd really love to find a 1940's military style dress pattern with a hat. What fun that would be to make!

Dating old sewing patterns isn't as easy as just looking on the pattern envelope... although thankfully in the later years most companies did decide on printing the year on the envelope. When dating a sewing pattern that does not have a year on the envelope, you'll want to consider a few things:
  • Look at the Price of the Pattern
  • Look at the character drawings
  • Look at the style of the fashion
  • Sizing of the pattern
  • Pattern Envelope Changes
The one thing you CAN NOT use to date a pattern is... the pattern number. Companies reissue patterns using the same numbers so this won't be very helpful.

For my research, I'm going to share how to date patterns ranging from the 1930's-1970's. From the 80's on the dates are pretty well established on sewing patterns.

  • Butterick was the very first home sewing pattern company started in 1863.
  • Vogue Patterns began in 1899 through mail order only, but didn't take off to be the Vogue we know today until 1916 when they were sold in department stores. Vogue patterns did not begin dating patterns until the 1970's.
  • Simplicity Sewing Patterns began in 1927 and began dating their patterns in the 1940's. In 1940 they dated the pattern envelope on the bottom front and then in the later 40's you'll find the date on the back side of the instruction sheet.
  • DuBerry Patterns were Woodward's Store brand patterns produced by Simplicity. The original prices ran from 10-15 cents.
  • McCall began business in 1870. You can usually dates their patterns on the bottom in fine print or behind the back flap of the envelope. In 1951 McCall added an "s" to their name so they we're known as McCall's. They were also the first to print on the paper pattern pieces.
  • Hollywood Patterns date between the 1930's- early 1950's.
  • Advance Patterns were designed for JCPenny from 1933-1966. Original prices started at 10 cents and went up to 75 cents.
  • Mail order patterns became popular in the 1940's and designs were featured in various woman's magazines with a coupon that could be cut out and sent in. There were various companies that offered these patterns, but some of the most popular were Anne Adams, Sue Burnett, and Marian Martin.

The Price of Patterns

The price of a pattern then, like today, would vary based upon an elaborate pattern verse a normal pattern. Printed patterns (pattern pieces with printed edges) were more expensive than unprinted patterns. (With unprinted patterns you match notches and cutouts together).Keeping that in mind, you can still get a rough idea of the era based upon price and then use further assessments to narrow it down father.

15 cent patterns were usually unprinted "common" patterns. 
25 cent patterns that were printed were more detailed and elaborate patterns.
35 cent patterns were generally around in the mid-late 1950's. Many children's styled patterns remained this price as the adult size patterns increased in price.
40 cents Butterick had NEW DELTA patterns in the 30's that were this pricey!
45 cent pattens include later 1960's Advance patterns
50 cent patterns were in the 1950's. Early 1950's elaborate patterns, such as coats, suit sets etc. were 50 cents, while in the late 50's this became common price for all patterns. Early 60's kept this price and children's patterns remained this price for awhile in the 60's.
60 cent patterns were 1960's
$1.00 patterns are generally late 60's into the 70's.
$1.25-$1.50 patterns started in the mid 1970's (huge price jumps in comparison to the earlier years!)
$2.00 patterns were seen at the end of the 70's.
$2.50-$3.75 patterns were seen into the early-mid 80's
$4.25 patterns were seen in the mid 80's as well

From then on, I'm guessing our grandma's couldn't imagine patterns costing so much (or maybe it was the invention of the "barcode

The Character Drawings & Fashion Sense

In the 1930's character sketches on the pattern featured very faded faces and just really an 'idea image' that it was an actual person. 1930's fashions featured feminine, flowing dresses. Many styles were cut on the bias to mold to your figure. Hemlines in fashion go down with the dollar (don't know why, it just has played out that way... conservative nature I guess) so when the 30's depression came, down went the hemlines all the way to the ankle where they remained until the end of the 1930's. During the depression era women began to sew more now than ever before. Clothing was mended time and time again before just being tossed to the wayside. Children's garments were sewn with the idea of passing them down to younger family members.

Anne Adams Pattern #1787


In the 1940's character sketches were more detailed, but generally the pattern envelopes were only printed in 2-3 colors in the early-mid 40's. Later 40's introduced more color to the envelope. The character featured generally had small pointy lips, defined small facial features, her hair was curled under or tightly coiffed. Fashion sense in the 1940's was all based upon the war. The US government was rationing items such as cloth, rubber, and metal so the fashion industry had to adapt. The government also put restrictions on how much yardage could be put into a piece of clothing. The only fashionable items that were not under restriction were wedding gowns and infant clothing. Dressing for the occasion was key. Because we were all in support of our troops in the war, we put the effort in on the home front as well. Some women took over the factory jobs that the men held previously, thus companies (and sewing patterns!) began to create "coveralls". Rosie the Riveter was born. If you took to the farming fields, women found that denim trousers were a must. It became acceptable for women to wear these things if they were doing such dirty jobs. Colors for everyday wear tended to be muted colors and brighter (for the time period) colors were reserved for Sunday services or evening wear. Many times characters were depicted doing something to show you what the outfit was designed for. An example of that would be a house dress... it was shown with a model with a broom in her hand. Clothing designed for going out in would have the character wearing gloves with her purse and possibly a hat.


Simplicity Pattern# 3782 


Simplicity Pattern # 1459


In the 1950's characters were in full Technicolor glory! Lots of vibrant colors. Models were still sketched out.  Hairstyles were generally a lot more "fluffy" rather than the tight, sleek look of the 40's. An hourglass figure was achieved by wearing foundation garments. Once the war was over the government released restrictions on fashion and in a rebellious nature Christian Dior created the bell dress which required wearing a petticoat underneath to help fill out the bottom half of the dress. A tiny waist was achieved by the use of girdles. Many of his runway designs used up to 5 yards of fabric in the skirt alone! In contrast, Chanel didn't care for Dior's New Look, and reinvented her designs to a more boxy suit jacket and slim pencil skirts. Givenchy followed suit with more slimming designs and A-lines that soon blossomed heavily in the 1960's.

McCall's Pattern # 9244
Indicative to the Christian Dior "NEW LOOK" of the era

Vogue Couturier Design Pattern #859
Inspired by Chanel's slimming look.


In the 1960's patterns mostly stuck with character drawings, but began to photograph live models wearing the clothing. The 60's era began much like the end of the 1950's, but very quickly began to take on a new style with the new first lady, Jacqueline Kennedy Onassis. Jackie's style was influenced by French couture and tended to be fitted, great lines, a very classic, timeless fashion sense. The mid-60's gave way to British Mod Fashions. Clothing became looser, more casual and the need for foundation garments had gone to the wayside. Clothing became brighter and more geometric. The late 60's gave way to the hippy fashion movement. Bell bottoms, jeans, fringe and flowers were all popular to the younger generation and continued to move into the 70's.

Simplicity Pattern #4768
Very Jackie O in style!


The British attacked with the 60's Mod Style
Simplicity Pattern #6973

Hippie Style. This Simplicity Pattern # 9374 is actually a pattern from 1971, as finding sewing patterns styled for "hippie"/bo-ho clothing weren't readily available in the 60's. I believe this is due to the fact that the "hippie" or hipster movement was designed to move away from the traditional and the younger generation didn't want to sew like their parents had. What crafting that took place in that scene was a more "free spirit", sew without a pattern/ create your own look idea. Embellishing ready made items were also popular in this scene. Painting on jeans and t-shirts (or heck, just skin!) was popular... adding beads and fringe to items became a way to express yourself.

Sizing of Pattern and how we've GROWN over the years

In the very beginning of home sewing patterns just a bust size was given. In the 1940's a bust AND hip measurement were given, but a waist measurement was NOT given because it was assumed that the sewer was experienced and able to change that part of the pattern to fit their need.

Up until 1956 a size 12 meant a bust size of 30. From 1956 on, a size 12 bust increased to 32". In 1967 they changed it again and a size 12 meant a bust of 34" and so it stands today.

While the bust measurement grew, so did the hip and waist measurements! Darn!

Pattern Envelope Changes

Just as today, graphic designers changed around the fonts and logo's. Here's a few dating tips for some of the major pattern companies:

Simplicity:
  • The 1930's was when Simplicity began to use color on their pattern envelopes. Previously, it had just been a brown printed paper envelope. The early 30's envelopes were small, but in 1934 they increased the size of the envelope to the standard we still see today. In 1941 the graphic font changed, and the logo down the side of the pattern went from grey to black with yellow writing. In 1944 Simplicity Printed Patterns font changed so that the word PRINTED was in red. In 1951, Simplicity added two black bars above the price of the pattern, which then changed in 1953 to ONE black bar. In 1957 they added one red line one inch from the left hand side of the pattern. 
Vogue
  • In the 1930's Vogue Patterns were in brown envelopes with the words VOGUE PATTERN in the upper left hand corner. In 1950 Vogue Patterns was moved to the right hand side of the envelope. Vogue Junior patterns were offered from 1945-1959.

If you have found a love of vintage sewing patterns, I have a couple of sites I'd like to recommend you check out:

Sewing Pattern Review : Just as the name implies, this is site reviews sewing patterns both new and vintage! Readers showcase how the pattern turned out for them and any tips or suggestions. Great to check out before you begin your next project!

Vintage Sewing Patterns On Loan : Accumulating patterns can get to be addictive (and expensive depending upon the type of pattern your looking for!) This website offers reproduction vintage patterns as well as complete originals. You can either buy them individually or get 4 free patterns a year by joining a membership ($25 fee). You can also earn free patterns by submitting a review of one of their patterns.

Fashion Era : Pick an era, any era! This site has all the fashion history you can imagine! I spend hours here. I love it!

And don't forget to Google "Vintage Pattern Reviews".... I love reading about other's adventures with old patterns! If you've got a blog and have tackled a vintage sewing pattern or two, please share!!

Speaking of hours and hours and blogs, I've spent hours here, so I think I'll end here, and hopefully you gained a little information, and PLEASE, if I've missed something, let me know... we're all here to learn!

Happy Sewing!
Angela

Tuesday, January 25, 2011

Progress... Slow and Steady CAN win the race...

Wow, blogging? Yeah, I've been bad about it. Basically, there just hasn't been any time at all to do it with the Christmas holiday rush and then Atlanta has quite the winter weather with snow and ice! The kids have been out of school for the last month and frankly, driving me nuts, LOL! In the summer we always have outdoor activities to do, but in the winter, my warm blooded children just like to stay inside and nit-pick at each other. But alas, in the chaos I have been making progress towards my modern technicolor lifestyle. Slow and steady progress will win the race!

Beauty Progress

I finally got the haircut I've been promising myself! I took this picture of Betty Grable into my stylist:
I absolutely love this classic style! I didn't go blond, rather I went dark, so I'm excited to be able to play with it and see how close I can get to coming up with this amazing Victory Roll style. I've also been spending time watching some YouTube video's on 1940's hairstyles. They are really fun to watch and helpful too!

Beauty Routine's were very important in times past. I'm still trying to figure out when is the best time of day for me to implement my routine, and I think I'll be splitting it up between a quick A.M. face cleaning then makeup for the day and then doing the majority of the routine (rolling hair, facials, etc.) during the evening hours. One problem I think today's woman has is learning that it is OK to take time for yourself! We have become martyrs and want to serve everyone else and then there is nothing left for ourselves. My pastor did a wonderful presentation one time that sticks in my head. Using a pitcher of water poured water into various glasses...he said that if we give and give and give eventually we will have nothing left. We need to take time at the well and gather up more water. I know I still need to put this into practice. One day at a time.

I did find an awesome link to creating your own fabric hair rollers! I got a chance to make the rollers but haven't tried them out yet. I made mine in a cute light blue cherry pattern and red check print. The only problem I had with making these was the step where you gather the stitches after stuffing. I set the gather stitch too far apart and it didn't really want to gather an 1" of material, so be sure to set your gather stitch to a small setting, or do what I did and simply wrap and tie the ends off. It made for the same look, but I'm sure gathering would have been easier. Like I said, I haven't tried them out yet, but I'll let you know how it works out!

Throughout my vintage beauty research, I've come across a few products that I'm in the process of testing out. Here's what I'm using... have you used these products? How have they worked for you?

Jergen's Cold Cream- In my 50's magazines there were ads for Jergen's Cold Cream, and since it's a lot cheaper than Pond's, I thought I would try it. In the meantime, I did hit up Pond's and ask them for a coupon because I would like to try their product, however it is nearly double the price of Jergen's and you get half the amount?! The most effective way to use cold cream is to leave it on your face for at least 5 minutes or more. My evening routine will consist of putting on my cold cream before wrapping my hair and once my hair is complete, then remove the cream. 

Teeth Whitening- I've always wanted to test out those Crest Whitening Strips, but again with being close to $30 a box, I've just never found that spare $30 to "test" a product with. I plan on wearing red lipstick so my teeth have to be white. I've recently gone to the dentist and gotten a cleaning... which should always be step number one. Then my next step? Baking soda and Peroxide! Yep... cheap, and everyone says it works instantly! You simply take a bit of baking soda, add enough peroxide DILUTED WITH WATER to make a paste then brush your teeth with it making sure to brush for at least 2 minutes. I'm sure it taste horrible but I'll rinse well and use Listerine afterwards. Now, one warning I read was  that it can remove dental glue (yikes!) so I'll brush gently around 2 areas of my mouth. Next, don't do this more than once a month. Baking soda is an abrasive and can actually wear the enamel off your teeth, so for me, I'll do this once and then stick to buying the Baking Soda & Peroxide Toothpaste and use that for daily use. Colgate has a newsletter that you can sign up for and get special coupons online.

Home Front

While I was getting my hair done I was flipping through a magazine when I came across this ad for the new Desperate Housewives season:

Personally, I've never seen the show, but um.... I have seen that vacuum before! Eva Longoria is holding MY vacuum... a 1957 Kirby 517. I've spent the last month cleaning her up and replacing some standard parts like the belts, light, and then buffing the metal to shine just as pretty as this picture! Ah, my dark hair, red lips, and Kirby vacuum... now if I could snag that dress please Ms. Longoria.... 

I also had the chance to attend an estate auction in North Caroloina and I am the proud new owner of a few boxes of vintage patterns! Most are from the 60's, 70's and 80's but I did score a handful of 50's patterns. I'll be selling the others on etsy so if those are your era's, please check out my listings!

So, with that being said, I'm off to tackle some pin curls and face cream! ;) Now that life is normal again, I really hope to be posting a lot more! 

Smiles =)
Angela


Sunday, January 2, 2011

New Year ~ New Schedule

It's been a busy season for sure! The holidays are now over, and throughout it all I have still been preparing for my challenge of living a modern day 1950's lifestyle. One of the most important things I needed to do was to have a schedule put in place. I've used other scheduling techniques in the past and some work better than others. This time around I am combining my modern day "FlyLady" approach with my vintage homemaking books to come up with a through schedule I believe will be kept.

The Good Housekeeping Housekeeping Book (1947) talks about a housekeeping calendar, "The home that runs smoothly and happily is one that is run by a plan or schedule, consciously or unconsciously. A schedule calling for a rigid hour by hour discharge of duties can never be applied to housework because it is difficult to meet and too discouraging."

The Woman's Home Companion Household Book (1948) says, "A cleaning schedule is a highly personalized matter, depending upon the size of the home and family, family habits, the age of the house, the amount of dirt in the neighborhood and many other factors." I know this to be true for a fact, because you can ask any Georgian about red clay dirt, and they'll have stories to tell! It stains like you wouldn't believe!!

It is true that a cleaning schedule is a highly personalized matter, but when you don't know where to begin, you feel a bit lost. At least that is how I felt a few years ago before I read the book, Sidetracked Home Executives (2001). My hard core, nitty griddy schedule comes from this book.


I'm going to walk you through how I got my schedule. To make a schedule box like mine you'll need the following items:

* One index card file box (I use a market found 1950's recipe box!)
* Colored index cards with at least 4 different colors
* Index Card Dividers- minimum of 43 dividers
* Pen
* 1 small yearly calendar that can be put on the inside top of your index card file box
* Clear Tape

Step 1: Tape your small calendar on the top of your index card file box. You can find a small yearly calendar either printable on the internet or checkbook register. Many times they print small yearly calendars that fit perfectly.

Step 2: Get 31 of the index card dividers and label each one, 1 through 31. One for each day of the month. Put them in your file box.

Step 3: Label the last four: Jan-Dec. One for each month. File these BEHIND your daily dividers.

Step 4: Separate your index cards into at least 4 different colors. One color will be "DAILY", one color will be "WEEKLY", one color will be "MONTHLY", and one color will be "SEASONALLY". You can use additional colors if you wish to divide chores into "Bi-Monthly", etc.

Step 5: This is the hardest part of schedule making, but once you do it, you only have to do it once no matter how many times you revise your schedule. Ready? Grab a sheet of paper and write down ALL the chores that need to be done. The best way I found to do this was to spend a few moments in every room. Don't just write down what you normally do, take time to write down things like scrubbing the baseboards, vacuuming the vents, turning your mattress, etc. Things you normally don't think of but possibly one time a year! The home books I listed above are also great references to remind you of things that you might overlook. Do your best here, and remember... if you forget something NO BIG DEAL.... it's index cards, simply add it once you remember it.

Step 6: Decide if the chore must be done Daily, Weekly, Bi-weekly (if you have cards for this), Monthly, or Seasonally. Again, depending upon your family type, you may have to vacuum the house once a week, but a large family of six has to vacuum daily! Fit the chore to your lifestyle.

Step 7: Once you have decided what chores need to be done and when, your ready to transfer them to an index card. Here is an example of how one of my cards look:

So, at the top I write how often the chore takes place. (Again, this will correlate with the index card color you've chosen for your weekly chores) Then I wrote Thurs, but don't worry about doing this yet! Then I write on the right hand side how long the chore should take. Underneath, I write the chore. Followed by a description of HOW to do the chore. Now, do *I* need to write down how to do the chore because I tend to be that forgetful? Nope. I write it down so that when I delegate this chore to someone else in the house THEY know how to do it. You might want to even write down WHERE to find the supplies they need. Explicit directions here will help you down the road when you encounter the person in your house that doesn't know how to do something!

lol! But... on the bright side, if I only have 2 days of my week that I have these jobs then I have 5 days that I'm not dealing with that drudging nagging feeling of "I should be doing this...." It's really not bad either when you look at the card and say, "ok.... this job just takes me 20 minutes to do. In 20 minutes it will be over!" Then I usually time myself and try to beat 20 minutes so it sort of makes a game out of it. Not that it makes me desire to do it anymore, but some rays of sunshine are better than none.

Not all of your cards will have days that they need to be done. That's good because then these cards can be inserted on various days of light cleaning.

Step 9: All of my old housekeeping books designated a day to do things, i.e. Monday- wash day, Tuesday- ironing, etc. Labeling your days is still a very good idea and also frees your mind up knowing that everything is scheduled.... so schedule your FREE TIME or time you want to do things! My personal days of the week look like this:

Sun- Spiritual Day. Time to spend with the family. Only daily chores/basics need to be done.
Mon- Laundry Day. I still make this laundry day and with six people, it's generally an all day event. Nevertheless it isn't the back breaking work it used to be, so while the machine washes clothes, I can be doing other light cleaning jobs, quick errands, etc. Great day to plan weekly schedules, meals, etc.
Tues- Moderate Cleaning Day. Cleaning for 2-4 hours.
Wed- Specific jobs day... means I can sew, or schedule things that I want to get done. Mainly for me, that's various crafting projects.
Thurs- Heavy Cleaning Day. Cleaning for 4-6 hours.
Fri- Errand Day. Market Day. Light jobs.
Sat- Family Fun Day. This is a requirement for us especially with little ones in various sporting events. Saturday's are usually busy with these events.

Step 10: Time to File! Check your days on your card. If you do your grocery shopping on Friday like I do, then you'll see when you get paid next, and then file that card BEHIND that date (example Friday the 7th), you'd file the card behind index divider #7. If Tuesday the 4th is your moderate cleaning day, take all your Tuesday cards and put them BEHIND card #4. Once your done with the cards you've assigned days to, check out the cards that are left. Divide the chores up between your light cleaning days and if they are monthly chores be sure to spread them out over the month. I try my best to keep Wednesday's as my time to sew and craft, so I'd rather do one or two extra things on a Monday or Friday then have to do them on a Wednesday.

Check out your seasonal cards. Some of mine include things like: Fertilize the Yard, Clean out the fireplace, Plant annual flowers, Steam Clean Carpet, etc. Obviously these are seasonal things and I sure wouldn't plant annuals in Dec! So, I'd take the "plant annual flowers" card and place it BEHIND the month of April. Now, again, things like this depend on what area of the country you live in. You certainly don't want to be planting annuals until all possibility of frost has gone for your area. Same with cleaning out the fireplace. I'll clean mine out for the season sometime in March... if you live in the northeast, you may not do it until April! Either way, file your seasonal cards behind the month that it needs to be done. This is also a great reminder if you have a vegetable/fruit garden to know when to plant things for your area.

Another idea, if you would like another color for index cards, you can include things like family and friends birthdays! Simply write down the person and date of birth. You can also keep handy information like favorite colors, sizes of clothing, and other things they like on this card. At the end of every month you will grab the following months cards and file them ONE WEEK (or more if you need to!) before they're birthday. This will give you time to shop for presents or send a card. As you can see from this example, this system can be expanded upon in numerous ways. Keeping track of chores, gardening, birthdays.... wow!

HOW TO USE THE SYSTEM


Using the system is easy. I wake up in the morning go to my box and take out all the cards behind TODAY'S date. Instantly there is my to-do list!

Now, no one is perfect and there WILL BE days when you don't get everything done. According to the SHE Book, you can do one of two things.... 1.- Reschedule it! If it's super important and it must get done then file it to be done on the next possible day. 2.- Forget it! Really? Yep, really. If it's something that can be moved to next week or heck, next month... then forget about it and just move it to a later time (or month!) Just be sure not to keep bumping that same chore over and over again, else it really won't ever get done! ;)

I've made up a "monthly" card and put it 4-5 days before the end of the month that reads: PREPARE FOR NEXT MONTH. So, say it's January, around January 27th-28th, I'll pull out any cards behind the month of February and file those and make sure no birthday's are Feb. 1st!

Hopefully I've explained my system here in a very basic, understandable way. You can always add more to this system. If you follow the FlyLady you can add in your Morning and Bedtime routines. You can add additional dividers and use them for "zones", "daily missions", and more! When you come across a vintage household tip that really works in a certain cleaning situation, be sure to write it down on that particular chore card so next time you'll remember!

I do highly recommend if this system seems like one you would like to follow to read "Sidetracked Home Executives" by Pam Young and Peggy Jones. It's an easy, fun read and they add menu cards and jobs for kids and more. I simply shared with you the parts of my system that I have tailored to meet my families needs. I've added my own bits along the way.

So, this is my schedule. I'm actually very excited to have it completed and I feel ready to tackle the new year! This year is the first time I'll also be using an online family calendar called cozi. Since this is the first time I'm using it and am just starting I don't have as much to say about this program except that it is designed to inform the family of everyone's events, it's a helpful menu assistant, and the best thing is, it's accessible to all family members to schedule information on.

I hope you have a wonderfully organized, blessed new year!

Smiles,
Angela

Monday, December 13, 2010

Progress... in various forms

It's been a few days since I've blogged because I've been working on a couple of things and the perfectionist in me wants to complete one thing, then blog about it. So I'm fighting my perfectionist nag, and am simply blogging anyway! (It really a big deal for me to conquer because I'm even strange how I eat my food... I only eat one item until it's gone before I can move on to something else... seriously, I am strange, lol!)

I've been thinking a lot about my project and while I began it thinking that I could simply do 100 days, I wasn't thinking about that freakish perfectionist in me. I forgot that I must PREPARE. Preparing is a big deal for me. Even when I was little and I'd play with my cousin, we'd play school or office but before we could "play" we had to prepare... we had to make forms or worksheets. Once we did that THEN we could play, but not before! I'm sort of tackling this project with the same child-like mindset. Not purposely mind you.... it just seems to be something in me that I must "prepare" to play. I do sort of look at this like playing house. It's much more fun that way. While I'm finding the historical facts I'm learning about to be quite interesting, I really don't think I mind if the image I'm imagining in my head is simply a fairytale. It sort of reminds me of the movie, The Truman Show with Jim Carrey. The plot of this movie is that a gentleman named Truman. He lives unknowingly on a constructed reality show. He believes his daily in's and out's are just that... daily life. Little does he know that behind the scenes there is a "real world", and that what the creators of the show have created is simply an image of a world that he lives in. 

That being said, I'm certainly not trying to escape "the real world", although lately with the more craziness that is on the news, sometimes I think I'd be crazy NOT to want to escape. I like the idea of the 1950's, no doubt. Rather or not June Cleaver was a true role model or not, does it really matter if that is how I'd like to run my house? Would it be so horrible if everything had a place, dinner was eaten at the dining room table, breakfast was piping hot oatmeal before sending the little ones out into the cold for school? I mean what would be so bad if I did a little prepping before my man came home from work? I'm certainly not trying to scare him off with my sweatpants and ponytail, but maybe changing things up with the monotony of life would be rather.... fun?! Imagine that!

So, who cares if I look at this project through eyes of a scientific historical nature, or simply through the eyes of a child who occasionally misses "playing house". There are other things I'd like to get out of this project, and my main goal is to simply find out how the women of the 50's (and previous generations) "just did it". Sure sounds like a simple mantra, but when society no longer has expectations as it did, it's easy to just fall into the hum-drum of the "same 'ol, same 'ol, why put on makeup when I just gotta run into Walmart" feeling. I'm tired of feeling like Walmart... I'm ready to feel like Bloomingdale's. ;) Surely I wouldn't walk into Bloomingdale's with no makeup, bumming it because then I would get a few stares! Basically I simply miss taking the time out for me. I like feeling good about myself. I like when my hair is done and makeup is on. Sure in the 1950's they may have said women did these things to "keep their man", and while it maybe true, it also prevented them from getting into a slump. Being put together, you feel rather "put together". It's still hard for me to find that "just do it" attitude but I'm trying.

As I mentioned before I've been working on a few projects. I recently became the new owner of a very nice 1957 Kirby vacuum. I love it. I'm working on refurbishing it to get it looking new again, and that's been fun. I've got a draft blog post about my progress, but again, the perfectionist in me isn't letting me post it right now.

I've also got a chance to go to the antique shop I love last weekend and I got a few awesome patterns. I've also ordered a couple off ebay and etsy and can't wait to get started making a few of the dresses! I've found I am very attracted to the 1940's slim dresses and then the princess in me loves the 1950's "New Look" tight waist, big poof skirts. Here is one of the patterns I got that I can't wait to get started on:

I love the lines in this dress, so flattering!

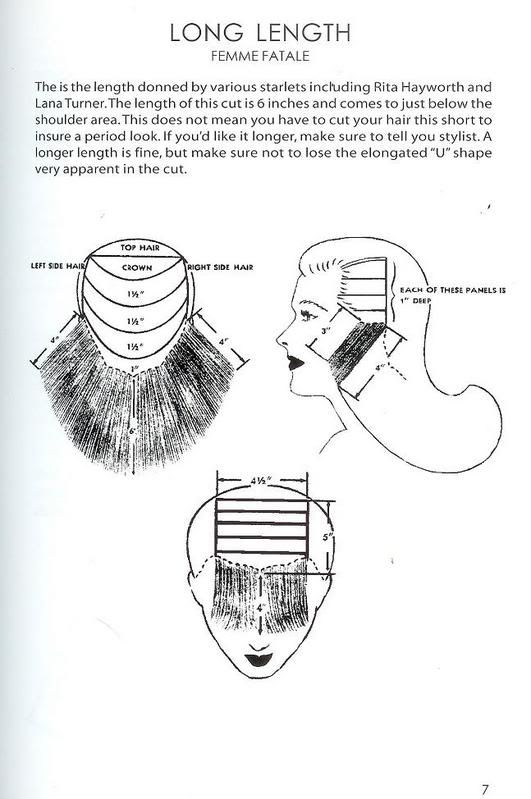
I've also been scoping out various makeup techniques and hairstyles. I've always found it really fun to play with makeup and hair, so I'm all about changing things up every now and again. My hair has been growing out and it's at the stage it's too long for my taste now, so it's about time to chop some off. I'm never a big fan of chopping it way off and I blame that on a really bad Hair Cuttery experience in the 7th grade. Ugh... I'll never visit Hair Cuttery again (or any other similar joint!) So I'm thinking getting it cut in a long length middy cut. (Even longer than these spec's) The middy cut was popular in the 1940's. The cut itself is a pretty basic layer cut only instead of it being cut straight across, it's cut in a "U" shape. 

 I'll also get my hair colored with various fun highlights because I want the look to appear fresh and young, not like grandma's hair! I've seen other bloggers with this cut and it's great because it looks like a normal layer cut on days they don't feel like doing vintage styles but when they do, they can easily play with it and it's cut for that as well. Sounds perfect to me!

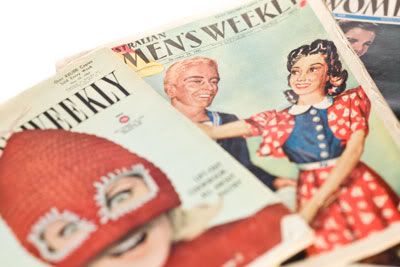
Another great tidbit I came across is that the Woman's Weekly magazine has been posted online from the 30's-early 80's.


So, for now, that's my progress. I think I'll keep preparing for my true 100 days and start that on Jan. 1? That is if I can get Ms. Perfectionist to hush long enough! ;)

Smiles,
Angela

Wednesday, December 8, 2010

Day 11 ~ Consumerism... Would you like fries with that?

This morning I woke up to a lovely blog post by my cousin talking about waste. I have to admit that before I began this project of mine, I really am ashamed to say, I never truly thought about waste. Somehow I selfishly thought that throwing things away, buying more, and not caring about the in's and out's of my consumption was just somehow my God-given right. I mean when you take out the trash and the trashman takes it away, do we ever really THINK about where it goes? It's something you can easily take for granted. I have to be honest too that the talk of "going green" for environmental concerns of global warming sorta grate at me because I don't believe in global warming. However, just because I don't believe in global warming doesn't mean I should get a free pass to make as much trash and waste as I want. It simply revolves around the common point of being responsible.


Being responsible means being educated and AWARE! Sometimes we do things just because  it's what we grew up with and it's second nature, we don't even think to THINK about it. An amusing story I once heard about traditions is a good example of what I'm talking about. A young woman was making a Christmas ham and she cut off the back part of the ham. She did it because her mother always did it. When her husband saw her, he asked "Why do you cut the back of the ham off?" She replied "because my mom always did." This got her thinking so the next time she talked to her mom she asked why she cut the back of the ham off. Her mother replied "because my mother always did". Curiosity got the best of the young woman so she called her grandmother and asked, "Grandma, why do you, mom and I cut the back off the ham?" Grandmother's response was, "I don't know why you and your mom do it, but I cut the back of the ham off because my pan was too small to hold the whole ham." 


So, sometimes we need to THINK about why we do things and not just do it because it's all we know. Times used to be different. Very different. While today it's chic and trendy to be environmentally conscious, our grandparents and great-grandparents were environmentally conscious and didn't even know it! 


Consumerism has a history. Here is just a brief example of some aspects of our countries consumption and results:


  • The 1920's is when "mass production" began. With inventions of things like the Ford Model T, companies began to build factories to mass produce items to sell to the American Public.
  • In 1930's households were shouldering an unprecedented amount of consumer debt. Consumer debt in the 1930's was not like it is today. Businessmen were borrowing money from banks and individuals then buying stocks in the mass produced market. Down payments were large. Contracts were short. Missed installment payments triggered repossession. (Just remember those old movies showing someone's thug coming to the businessman's house and dragging the wife out of her fur coat and taking the silverware!) Cutting consumption was the only viable strategy in 1930 for avoiding default. Indebted households chose to default rather than reduce consumption. This resulted in a minor recession becoming the full on GREAT DEPRESSION. 
  • IN 1940's during WWII, consumption was regulated. An excellent article from the American Historical Society explains rationing in the United States. Even if you could afford items, you were restricted on how much you could buy based upon coupon books that were given to each family. It was required to ration items because the government needed things like rubber, wool, steel, oil, etc. Using less on the home front meant that our boys at war would not go without.

  • The 1950's truly sparked the consumerism that we are so familiar with today. In the early 50's average household debt was virtually unheard of. But the 1950's were a very exciting age to live in because so many new products were being introduced... it's the age of the radio blooming into the TV, the refrigerators and stoves were becoming "high tech" electrical appliances, washers would soon have a companion... DRYERS! Advertisers were able to sell the public more and more, especially with the invention of TV which led to the COMMERCIAL! 


I had to include the Jello commercial just because of the "Busy Day" theme, and it made me giggle. 
Soon there were credit card commercials. This one is an example on how the commercial had to show the American public HOW to use a credit card. Today, our kids grow up just knowing, and don't know anything different. 

Once credit was released, there were various programs of "buy now, pay later". Either way the consumers desire to have it NOW prevailed, and still does today. In 1953 Eisenhower took office and the US government encouraged American's to buy and consume American products so that America's economy would skyrocket to lead the nations. Economically speaking, it seems to make sense to me:

Country A produces a product = Country B buys the product = Country A gets money. Simple concept.

Country A produces a product = Country A consumes the product = Money (and jobs) remain in Country A. Another simple concept. 

So, that's basic economics. I can remember my great-grandparents and grandfather always talking about "Buy American". I never really got WHY. I just thought they were really patriotic or something. They also talked a lot about the unions... and I didn't know why.

In the Eisenhower years it was stated that if we, as American's could produce more goods we would be able to sell more to reach a high global status. In order to produce more goods, it meant the average worker would have to work a large amount of hours. Factories began requiring individuals to work excessively long hours. The union was formed in an effort to make sure that fair labor practices were enforced. American's typically today are still working longer hours and spending less time on vacations than other industrialized countries. The top producing countries are still China and Singapore. Rural migrant workers in China can work 12 hours A DAY, 26 days a month.

This abcnews video shows what Chinese production workers have to go through:

http://abcnews.go.com/WNT/video/educating-china-12155692

I highly recommend watching the above link just to have a visual the next time you plan on shopping at a "big box" store like Walmart and Costco. 

So, what does all of the above knowledge bring *ME* to do?

1.) Listen to my great grandparents and BUY AMERICAN. Looking for American made products is a new concept for me. I like knowing that *I* control my dollar and where I want it to go. American items may cost a bit more, but with my new outlook on simplicity, not buying as much will mean I have more money to buy things that I truly need and will be able to afford American. So much of our clothing is made in other countries, but it is considered disposable clothing. Cheap $5, $8, $10 t-shirts only last a few months. 

2.) Consume less. Live Simply. Sure, it ends up being "green living", but it goes back to old fashioned ways. The overabundance of stuff has overwhelmed most of us. We live cluttered lives and are highly stressed whether we are coming or going. We aren't happy accumulating more STUFF.... whatever highs are all momentary until we need something else. 

3.) Buying Used. I'm a lover of all things vintage to begin with. My mom used to take us to various antique shops while we were on vacation, so maybe my love stems from early on. I'm not ashamed to walk into Goodwill, Thrift Stores and other "junk shops". I'm a treasure hunter at heart. I search out old things that I can put to use again. Most of the things I find are better made then today's counterpart.

4.) REUSE. Reusing things can be a fun and innovative process. One couple in an attempt to live a year with "no new plastics" found various ways of reusing containers to hold their pantry goods. While I don't plan on plastic-free living, I can use some of these ideas! I also love the idea of putting your fruits and veggies in your own handmade bags! I also want to take the time to make my own grocery bags that I enjoy looking at... and are helping to reduce the landfill of various grocery bags.

5.) Buy Local. I'm in a search of local businesses in my area that I can purchase everyday goods from. I want to avoid the mass-marketed "big box" stores as much as possible. Walmart and KMart are easy to avoid, it'll be Target that's my downfall. I love their decorating goodies! In west-Atlanta it's really hard to find "local" goods. In comparison to north and east of Atlanta where the population is heavier, you can find local goods easier. Again maybe I'm so used to seeing my day to day surroundings I miss it, but I'm trying to search them out.
 

6.) Remain Open Minded. As I continue on my journey, I'm trying to keep my mind open to new ideas (or old ideas, whichever the case may be!) Learning new things, and doing blog projects to help encourage a better lifestyle are all things I look forward to.
Overall, I'd like to reduce the number of items in my house. Giving things away to charities. I'd like the things that surround me to bring me and my family joy. Understanding that as people we are NOT entitled to living without a care. It's not our God-given right to selfishly lavish a more, more, more lifestyle. It's time each one of us takes control of our own families consumption. Whether or not is chic and trendy, or just old fashioned common sense, it's the responsible thing to do!
Smiles,
Angela


Monday, December 6, 2010

Day 10~ Vintage Style

Today, instead of talking about my latest cleaning adventure (which has really just been Christmas decorating this past weekend), I'd like to chat about 1950's fashion. As I'm sitting here, in my heated home, still chilled to the bone, I ponder a question.... How did these lovely ladies stay warm in the winter? Stereotypically when one thinks of that 1950 fashion, you think of a beautiful light, full, cinched waisted cotton dress... usually a sundress! So, I've gotta scope out the info. on this because I really wanta know! 


The war ended in 1947, and in 1951 between the US and Germany. During the war, wartime fashion was considered simple and minimalistic. Having an elaborate wardrobe was frivolous, and was perceived to go against the war effort, after all, coupon books would be issued to families and they were only allowed to buy items by trading in the coupons. It was called rationing... something that today's American family wouldn't understand, nor hardly tolerate I would presume. The rations weren't horrible, in my opinion, but true, you would sometimes have to just "make do". (Something I am very familiar with being a housewife in a two income society!) An example of yearly rations included: a woman could purchase 11 dresses, but only 2 pairs of stockings. Again, my curiosity wonders how you could get a years daily use out of 2 pairs of stockings! Wool was a commodity at the time and was highly sought after because that is what the military used to make uniforms. It's important to get an idea of what the women in 1940 went through, so you can understand their mindsets when the 1950's came.


The 1950's entered a new fashion era, inspired by the "New Look", a clothing line by Christian Dior. The signature shape was characterized by a below-mid-calf length, full-skirt, large bust, and small waist. Dior also created the two piece suits consisting of a fitted jacket and a pencil skirt. Some of Dior's designs used many, many yards of fabric. (Sometimes up to 20 yards!) American's viewed Dior's designs with opposition due to the previous fabric rationing in the war, but then soon adapted to the new fashion.


Prices for clothes were at an all time high and women wanted looks that were versatile. Soon "convertible" clothes came onto the scene. These were clothes that allowed women to get more use out of them depending upon the occasion or the season. For example, some dresses had convertible sleeves. Slim pencil skirts had an over skirt which, if buttoned or tied on would give the appearance of a full skirt. Here is an example of such a pattern:
In the winter, women wore their clothing made out of sheer wool, wool jersey, yarn-dyed wools, silk taffetas and velvet. (But I still wonder how they kept their legs warm!) 
This image shows a quite warmly dressed woman outside.... but oh how cold it must have been when the wind was blustery... and what about her toes?! Burrr..... for the sake of these women I have to keep researching, please tell me there were wool stockings in the 50's! Even in this 50's jacket pattern, the sketch appears as if she's freezing her legs off!

Alas, I've searched and searched and here's what I've found as the history of hose... they began as wool stockings (smart!), but in the 1920's they turned to silk, in the 40's nylon became the affordable solution, and in 1950 the seamless stocking was born, although it took off slowly, most women still wore seamed stockings until the 1960's. Seamless stockings gave the appearance of bare legs which was considered a big no-no! After the war demand for stockings was exceptionally high! (After all, remember they could only get 2 pairs a year!) In 1945 Macy's stocked 50,000 pairs of nylons and they sold out in six hours! 


If your looking for full fashion 1950's seamed stockings, look no further than Magnolia Hosiery. They have been in business since 1954, and still produce the same seamed stockings (#3975) on the same equipment for 45 years!

So, I'm guessing that the average 1950's woman had to simply deal with cold legs and feet, all for the love (or expectations!) of fashion. Thankfully the late 1940's early 50's vehicles had improved heating elements in their vehicles as compared to the 20's and 30's. Oh how we take such things for granted now! 

One does have to wonder tho, with the issue of cold legs and toes, if that caused the fashion industry to create... the bullet bra.


Smiles ~

Angela


Thursday, December 2, 2010

Day #9 ~ The Business Center

One of the things I was surprised to see in "America's Housekeeping Book" was a page called "The Business Center". (You can click on the image to read it)


One of the things I requested when we built our home was to have a desk area in the kitchen. I had seen it in other homes and it always seemed to just make sense to me. Unfortunately, I've never truly utilized the space as well as I could have and it soon just became another "dumping ground" for large stacks of papers that were to be sorted through later (and later just never seemed to come!). The problem, I believe, is that it was never truly organized in the first place. When you see such a clean and organized desk as in America's Housekeeping Book, it can motivate you to clean and duplicate that image. So... it's taken me three days to do so. 


Admittedly, I still have a small laundry basket that I've filled with items that I can't find a true home for, but if I can't find them homes in the next week then I'll just toss 'em out. That's the point I'm at right now. =) 


One of the suggestions the book gave was to have a bulletin board to keep the family posted as to everyone's where abouts. I've recently found a great website called cozi. It's a modern day's family solution to the bulletin board, only better! You simply plug in your schedule (it organizes it and color codes each individual family member!) and cozi will send a text message to assigned individuals reminding them of upcoming events. It also keeps track of your to-do lists, shopping lists, recipes, and more. I highly recommend checking them out, and best of all, it's FREE! If you like the FlyLady like I do, you'll also find that you can sync cozi with your FlyLady schedule! Really, how cool is that?!


Another cool thing about the homemaker's photo above is the radio! One way you can replicate that style is obviously heading to the antique stores, or Target! Check out the Crosley collection of radio's at Target. They have various styles, but the best things about these modern vintage styled radio's is that many can play records, cd's, cassette tapes and even ipods!


This way you can listen to your favorite 1950's tunes and if your lucky, still capture that slightly scratchy sound of a vintage record! It's a great way of blending the old with the new. 

While my kitchen, with the dark wood cabinets and black speckled countertops don't scream 1950's, I do plan to add touches of it with my decorating, now that I am completely organized. =) It's great to have sort of a clean slate to be able to search out darling little vintage treasures to decorate with. To browse fabrics with ideas of making cafe curtains, chair pads, and stool covers. Searching for treasures, to me, is more fun then just being able to go to the store and purchasing something new. There is just something about the hunt. 

Taking the time to actually organize this space in my life makes me feel comfortable. I now know where things go, and there is a feeling of calmness. The feeling comes because I know that items aren't hidden away just waiting to bust out of the drawers, but rather each cabinet and drawer has been organized. One of the reasons I am tackling this project is because I always want to have time to bake, sew, and do many of the great projects I read about in magazines but it seems as if the daily workload just never ends. I'm so excited to be able to open my Better Homes & Gardens Cookbook and begin making some of the lovely Christmas cookie recipes. Having this calm, peacefulness in the kitchen just inspires me to tackle the rest of the house. 

Tomorrow I will begin the living room. That is a fairly simple project for me as I've tackled the organization of that room a few months back. One thing I've learned is that once the area is organized, it does generally stay that way, especially if you keep up on the maintenance. That is what used to scare me... maintenance, as if it would take me just as long to maintain it as it was to thoroughly organize it, but I couldn't be more wrong. It only takes a few moments to tidy up, and with an organized daily schedule, it really won't take long at all and it will give me the time to tackle the fun projects I wish to do. 

~ Smiles ~
Angela